摩尔网 > CG教程 > Autodesk Maya教程
我的名字是瑞恩里德,我目前在大学的一名大四学生学习的3D图形和设计。我的父亲在7岁时就过早地向我介绍了3D软件,我一直在研究和实践我的手艺在我的教育至今。我将展示我的一些进程的创建Mondus的。
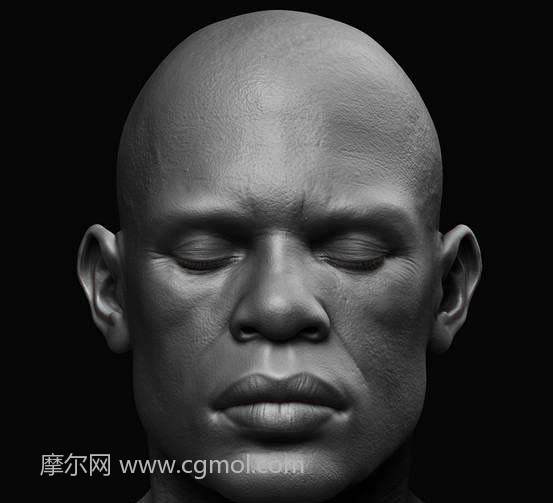
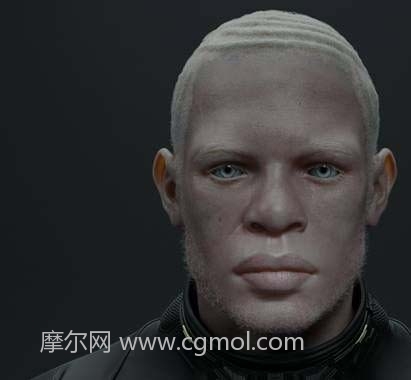
之前,我潜入造型Mondus,我想找到的东西,在CG界还没有挖掘到。我做了一些头脑风暴和第一个在ZBrush概念阶段,然后选择创建achromasia(也称为白化病),非洲的男人。我做了它是如何造成的,它基本上是一种遗传性疾病的特点是几乎没有黑色素的生成一些研究。我碰到一个公众人物,他的名字是节目播音员朱厄尔,其特点是独一无二的,所以我搜集引用他以及其他非洲开始之前白化人物雕刻。
My name is Ryan Reid and I am currently asenior student in college studying 3D graphics and design. I started drawing atthe age of to, my father introduced me to 3D software at the early age ofseven, and I have been studying and practicing my craft throughout my educationever since. I will be showing some of my processes for the creation of Mondus.
Before I dived into modeling Mondus, Iwanted to find something that the CG community hadnt tapped into. I did somebrainstorming and concepting in ZBrush first and then chose to create anAfrican male with achromasia (also known as albinism). I did some research onhow it is caused and it is basically an inherited disorder characterized bylittle or no melanin production. I came across a public figure whose name isDeejay Jewell, whose features were unique, so I gathered references on him aswell as other African albino figures before beginning to sculpt.

Step 01: Sculpting
In ZBrush I started out sculpting the headfrom a sphere and went through many changes until I got a good base. Once I washappy with my base mesh, I moved to secondary forms, which were subtle wrinklesand asymmetry. After my secondary forms were completed, I started my tertiarydetailing. For this step I used scan data alphas from Surface Mimic. I also dida lot of manual work using the Dam Standard brush for tight wrinkles and lipdetail. For my main sculpting brush, I used the Clay Build Up brush.
一:雕刻
在ZBrush我开始从一个球体雕塑的头部,并通过了很多变化,直到我得到了一个很好的基础。我很满意我的基础网格,我移动到辅助的形式,这是细微的皱纹和不对称。我的辅助形式完成后,我开始了我的第三细节。对于这一步我用扫描数据阿尔法从表面模仿,我也做了很多使用的大坝标准刷紧的皱纹和唇线的手工工作。对于我的主要雕刻刷,我用的是黏土建立刷。
使用ZBrushMondus的脸雕刻
Step 02: Texture maps
I created my diffuse texture map in MARI byprojecting photo images onto my head model. My normal map was from ZBrush sinceall the tertiary detail was created there. Once I created my normal map, Igenerated an ambient occlusion map and a cavity map from my normal map with anaction script I used in Photoshop. Once I created the ambient and cavity map, Icombined them together in Photoshop to create my specular map. I then painteddarker areas and lighter areas, which then became my roughness map.
二、纹理贴图
我创建了MARI的漫反射贴图通过照片图像投射到我的头部模型。我法线贴图是从ZBrush的,因为所有的三级细节被创造那里。我建立了我的正常的地图,我产生一个环境闭塞地图,从一腔地图我与我在Photoshop中使用。我创建了环境和型腔地图动作脚本法线贴图,我在Photoshop结合在一起他们创造我的高光贴图,然后我画暗区和较亮的区域,然后成为我的粗糙的地图。
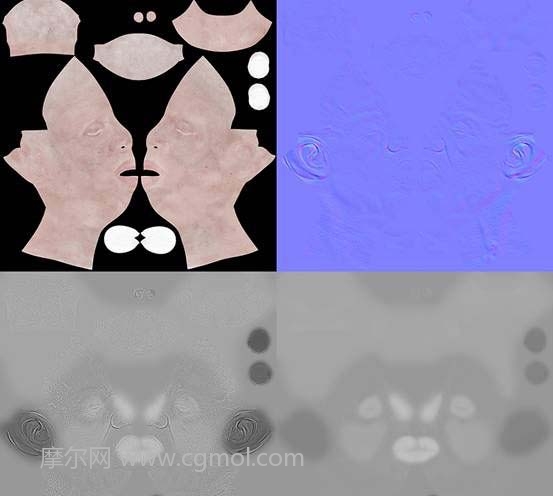
已应用于我的皮肤着色材料混合四张地图
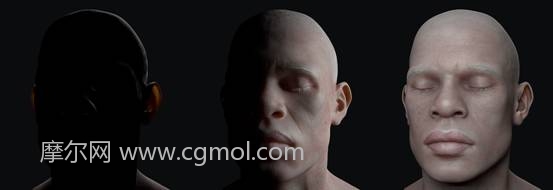
Step 03: Skin shader
For my rendering engine, I used V-Ray.After I created my V-Ray shader connections with different material blends, Ithen created a light rig to show how the skin shader reacted. Before you lightyour scene, I would suggest creating a simple light rig to show how the skinshader is reacting under different light intensities. Your skin shader shouldbe able to look pretty good in any type of lighting situation. Using differentHDR images is also good for testing your skin shader. For example, I used oneV-Ray rectangle light that did a 360 around my model.
三、皮肤着色器
对于我的渲染引擎,我使用的V-Ray,我创建了不同的材料混合我的V-Ray着色器连接之后,然后我创建了一个光台,以显示皮肤材质的反应如何。点亮你的场景,我建议建立一个简单的轻装备展示如何在皮肤着色器不同光照条件下的反应,你的皮肤着色器应该能够看起来不错的任何类型的光线条件下,利用不同的HDR图像,也对测试你的皮肤着色器。例如,我使用的做了360在我的模型中的一个的V-Ray光线的矩形。
Step 04: Hair modeling
For the next step I decided to take on aunique design for braided hair. I started out by creating a three-part braid inMaya, and then converted the geometry to an IMM brush, which was done inZBrush. Once I created the brush, I drew on my model where I wanted the braidsto be placed. Once placed, I then Polygrouped the hair geometry and createdfanning to the root of each sub-braid. This way, when I generate the hair inMaya, each root will look different and feel well-rooted.
四、头发造型
对于下一步,我决定采取一个独特的设计,编发。我开始通过Maya创建由三部分组成的辫,然后转换几何到IMM刷,这是在ZBrush完成的。我创建了刷,我画了我的模型,我想辫子放置。一旦放置,然后我Polygrouped头发的几何形状和创建煽动每个子编织物。这样,我产生在Maya头发上,每一根会看起来不同,感觉良好根深蒂固。
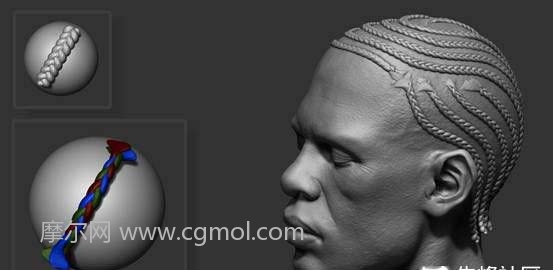
如何编织形成视觉的一步
Step 05: Extract curves
For this step my hair geometry is now inMaya. I extracted NURBS curves from each sub-braid and there you have it: aperfect set of braided hair guides. I applied Mayas nHair system and used aV-Ray hair material as the override shading for the hair system. I distributeda couple of nHair systems to random sub-braids, which were named and grouped inthe outliner, which allowed me to select any sub-braid curve group and applyaccordingly for extreme breakup.
五、提取曲线
对于这一步我的头发几何现在在Maya中我提取NURBS曲线从每个子编织:一套完美编发指南我申请Maya的nHair系统和使用的V-Ray头发材料作为覆盖底纹头发系统。我分配了几个nHair系统随机分辫子,分别命名,并在大纲分组,这让我选择任何子编织曲线组并据此申请极端解体。
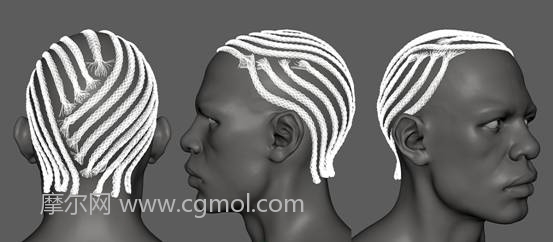
转换辫子的几何形状NURBS曲线
Step 06: Root hairs
After I converted the braids to NURBScurves, I had to create individual root hairs in-between the braids in order toconvey how tightly they were braided. For this step I used XGen, which is ahair-generating system that was introduced in Maya 2015. In Maya 2016, there isa new function called "Add or Move Guides", which I used to add eachroot hair individually. One of XGens special functions is its interpolation offiguring out the directionality of the hairs. I can simply place each hair curvewithout rotating them in the right direction. Using XGen saved me lots of timefor this step. I made sure each root guide curve penetrated the braid curves,so when I added a nHair system to the root hairs later, the render would giveoff a fake blending between the root hairs and the braided curves.
六、根毛
我转换到NURBS曲线的辫子,我不得不以传达他们是如何紧密地编织创建单独的根毛的辫子在两者之间。对于这一步我用的XGen,这是在Maya推出了头发生成系统2015年,在Maya2016年,有一个叫“添加或移动指南”的新功能,这是我用来增加每一根毛发独立,其中之一的XGen的特殊功能,就是它搞清楚毛发的方向性插值。我可以简单地每根头发曲线没有在正确的方向旋转它们。用的XGen救了我大量的时间进行这一步。我确信每一根引导曲线渗入编织的曲线,所以当我增加了一个nHair系统根毛后,渲染会发出根毛和编织曲线之间假的融合。
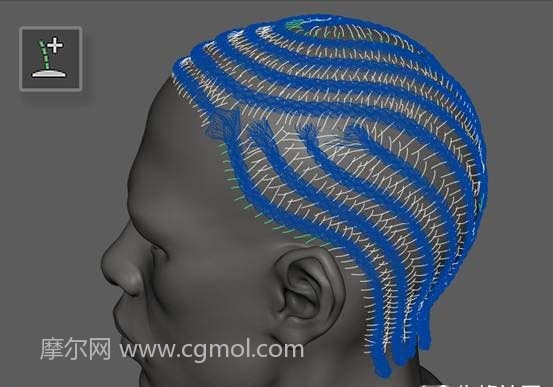
视觉步骤的根源是如何
Step 07: Hair result
After I successfully created the braids androots, I then had to create loose curly hair for his hairline and shaved beard.I used Fibermesh in ZBrush to spawn the hairline and shaved beard. Its a verystraightforward process; I simply masked off where I wanted the hair to spawnand tweaked the parameters in the Fibermesh UI to give the hair a wispy curl.Once I completed the hair with Fibermesh, theres a pull-down menu that allowsyou to export the Fibermesh as curves. I then created another nHair system tospawn nHair in place of the curves from ZBrush. Due to the density of Africanhair, the overall nHair count was pretty harsh, but it gave me a stunningresult. With the hair sorted I was finished and very happy with the finalresult.
七、头发结果
我成功地创建了辫子和根之后,我便不得不创造自己的发际线松散卷曲的头发剃胡须我用FiberMesh系统在ZBrush产卵发际线剃胡须这是一个非常简单的过程,我只是屏蔽了,我想头发产卵和调整的FiberMesh系统UI的参数给头发稀疏卷曲。一旦我完成了FiberMesh系统在头发上,有一个下拉菜单,让您的FiberMesh系统导出为曲线。然后,我创建了另一个nHair系统产卵nHair到位,从ZBrush的曲线的,由于非洲的头发密度,整体nHair数量是相当苛刻的,但它给了我一个惊人的结果。随着头发整理完后,非常高兴最终结果。
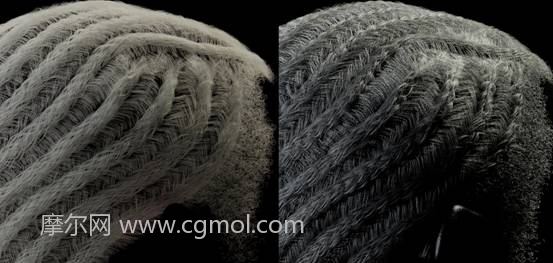
显示nHair的GI和镜面通道
上一篇: Maya怎么制作逼真的老爷车模型 下一篇: Maya怎么制作人形野猪怪模型